Tact Hello World
Introduction to TON Smart Contracts using Tact
In this guide, we will walk through the process of creating and deploying a simple smart contract using the Tact program language. The main goal is trying and touch the smart contract developing process and find out what you should learn next. You need to spend about one-two hours, depending on your background knowledge.
Did you notice something unclear, incorrect or get stuck with some issue in this guide? Please ask a question in the Telegram chat (opens in a new tab) or text me directly @iftryalexg (opens in a new tab). Guide will be updated ASAP and all unclear points will be clarified 🚒💦🔥.
Tact's facts #1
Five things you need to know in the beginning:
- Smart contract is a computer program that stores and executes in blockchain.
- Blockchain is a shared and structured way to keep data. Data stored in blockchain is impossible to edit and be replaced with fake.
- TON Blockchain works on its own special program software, called the Ton Virtual Machine (TVM).
- Tact is a special computer language that helps people make smart contracts on the TON blockchain. Smart contracts are like computer programs that live on the internet and can do things like store information and make decisions.
- Tact uses JavaScript frameworks, so basic knowledge of them helps you learn it faster, but even if you are just a newcomer it is possible to learn from the scratch.
Blockchain is like a digital notebook where important information is written down and shared with many people. Once something is written in the notebook, it can't be changed or erased. It's like a permanent record that everyone can trust. But instead of a notebook, it is stored on multiple servers. And instead of just one person writing in it, many people can write in it at the same time. This way, everyone can see and agree on the information that is written in the blockchain. And because it's placed on a multiple servers, it's safe and can't be lost or changed by accident.
Tactical practice #1 - set up your environment
Get ready to build your own blockchain creation! First, you'll need to gather a few tools to help you along the way.
- Git is like a magic toolbox for developers. It helps you keep track of all the different parts of your project, so you can work on them together with your team. You can download it here (opens in a new tab).
- NodeJS is a central tool in JavaScript world. We'll be using JavaScript and its special version called TypeScript to create our smart contract. You can download it here (opens in a new tab).
- JavaScript IDE is like your own personal workshop. It's where you'll be building and designing your code, a text editor for code with highlighting. A popular choice is VS Code (opens in a new tab), for example. Get it now and let's get building!
- Tact language extension for IDE makes it more comfortable to work. For example, in VS Code you can install an extension (opens in a new tab).
Tact's facts #2
Once git is installed, you can use the command line or terminal to navigate to the folder where you want to create your project.
Then, you need to use the command git clone <link> to copy the project files from the internet. The link is usually provided by the project creator or can be found on a code hosting platform like GitHub.
The project files will be downloaded and stored in a new folder with the same name as the project.
From there, you can start working on the project and make changes. You can use commands like git add, git commit, and git push to save your changes and share them with others working on the project.
Note that git is a complex tool with many features and commands, but for beginners, these basic steps will be enough to get started. In the current guide we will use git clone only. As you continue to work with git, you can learn more advanced features and commands.
Commands for git and terminal generally will be demonstrated in a special code block:
command that you should input in your command lineYou should execute it in your terminal (opens in a new tab) bash, zdsh, windows PowerShell or IDE implicit command line.
Tactical practice #2 - get template from GitHub
For beginning let's take basic tact project from a community repository.
Install yarn tool
To manage our project with comfort we will use yarn, you need install it with a following command:
npm install --global yarn:::info Windows scripts execution
For launching scripts in Windows terminal in first time, you should allow (opens in a new tab) this action. You can input and execute from terminal command: Set-ExecutionPolicy -ExecutionPolicy RemoteSigned -Scope CurrentUser. It will allow to run commands with yarn from terminal.
:::
Choose local directory
Choose a local directory, where you want to keep your project.
For example, if you want to place you project in new directory dev:
cd C:\ mkdir dev cd dev- For Linux/MacOS
cd ~ mkdir dev cd devClone template of Tact project to your local environment
Clone with command:
git clone https://github.com/ton-community/tact-guide-templateThen open new downloaded local directory:
cd tact-guide-templateUpdate and check
To finish the installation process and resolve predefined dependencies for tact-template, check updates of relevant libraries via the following commands:
yarn installyarn add ton-tactNow check, that everything is ok, input command:
yarn buildResult of successes executing this should be see in your terminal window like following:
Tact's facts #3
tact-guide-template is basic demo project for developing smart contract on Tact language. Let's learn general things about this:
- By default, this project has a number of additional frameworks used in it, that specified in
yarn. To simplify, we skip details of this in current lesson and will take attention to the general structure, where smart contract define. All you need to use template, resolving dependencies withyarn add ton-tactwe did before. - Most important directory for us placed in
tact-guide-template/sources/path and contents following:
+--tact-guide-template
|   +--sources
|   |  +-- contract.deploy.ts
|   |  +-- contract.spec.ts
|   |  +-- contract.tact
-
contract.tact- Tact language smart contract will be written here. -
contract.spec.ts- contents tests for usingyarn testsfor launching local tests. Not necessary part for deployment. Some actions we want to check before using smart contract in productions really faster to check with local tests. -
contract.deploy.ts- contents instructions to generate a deployment link. This link includes all necessary information to send our smart contract in blockchain. When our smart contract is delivered in TON Blockchain as bytecode he becomes deployed. -
As a result we use three yarn commands to work with Tact project:
yarn build # To build contract
yarn test # To test contract
yarn deploy # To deploy contract
Tact's deep thoughts #1
A lot of important details you should learn to understand how TON works, but here, we simplify our field of knowledge and goals. So, let's say, contracts and messages are our main characters in blockchain.
-
contract - is a computer program that lives on the blockchain. It can store information and carry out certain actions based on the instructions that are written inside it.
-
message - is a command that we send to the contract. It tells the contract what to do and can include information like how much funds to transfer or what information to store.
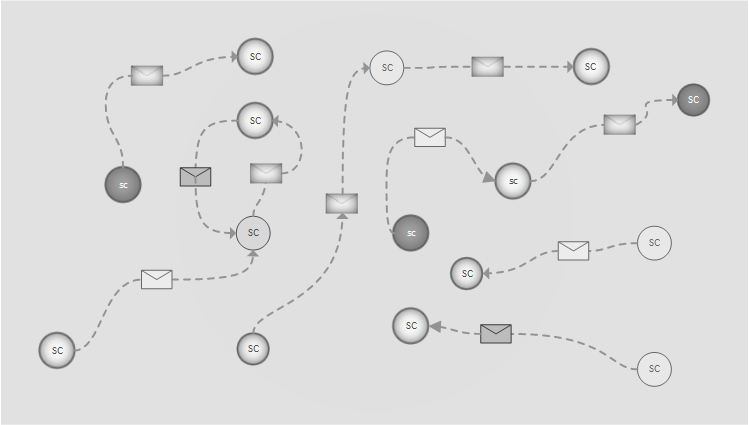
On the scheme you can see not perfectly accurate graphic representation of working in blockchain, where different smart contracts (circles) communicate to each other with messages.
Additional general tool, that extends functions of contracts - is getters or get functions. This feature allows to get read-only information from contract's data. Usually, get-function is using to deliver information(for example, smart-contract current balance) to the application, but it is impossible to call it from another contract.
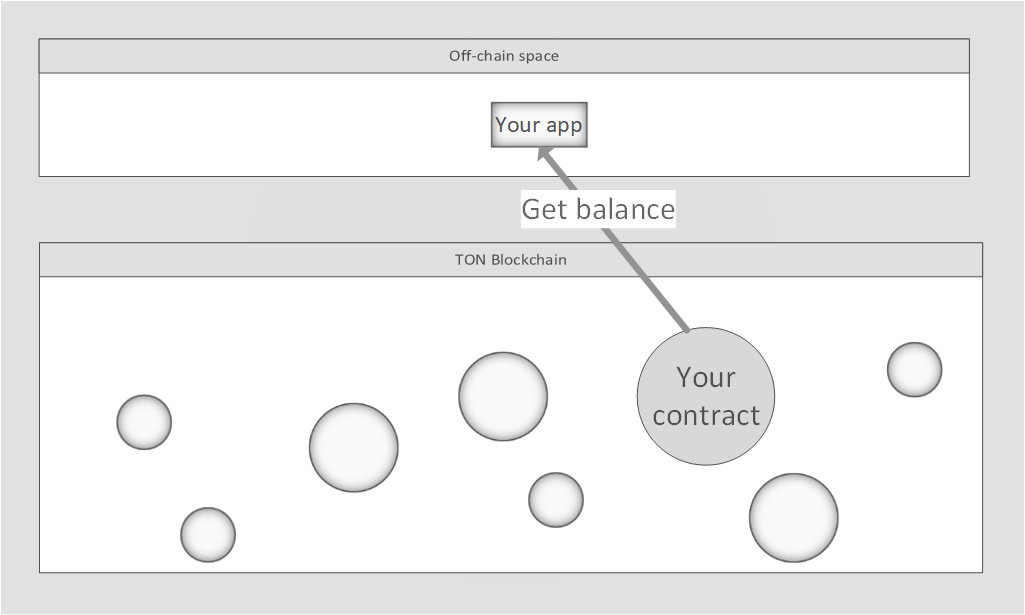
To summarize these, in common words, main goal of smart contract developer is to declare and write logic of actions in smart contract correspondingly to messages it gets from other smart contracts. If it is necessary to get information and deliver it off-chain(common web app), there are get functions that should be declared.
Let's talk about the design of our contract. Our smart contract is like a piggy bank with several common features:
- Keep Total value. We will keep
Totalinteger value in blockchain. - Get Total value. Special tool for reading current
Totalvalue from blockchain. We can read this directly from blockchain via specialgetmethod. - Processing "Increment" text comment command. When contract gets a message, it checks what the message says. If the message says "Increment," it will add
1to theTotalinside the piggy bank and update it. - Processing
Addmessage command. If the message says "Add," it will add a specific number to the Total inside the piggy bank and update it.
Additional restriction for our smart contract - It will check if the person sending the message is the owner of the piggy bank or not. This way, only the owner can add or increment the Total inside the piggy bank.
Tactical practice #3 - create contract
Let's open our tact-guide-template project via IDE(VScode) and begin to write contract file contract.tact. That, our first Tact string is declaring additional library, where some usefully Tact functions defined.
@stdlib/deploy module extends our tools with Trait Deployable, so we can use it Trait later and its contents messages.
Note, that Tact language consists of some unusual for classic program language entities, here is what we face in the lesson:
| Type | Description |
|---|---|
| Contract | Tact type that declares contract entity in it's {} block. |
| Message | Tact type for convenient message's declaration. |
| Trait | Struct similar to Contract, but serves as extension for Contract(it's similar to interfaces or inheritance for Classes in classic Object‑oriented PL). |
| Address | Smart contract address in according TON standards. You'll see this parameter as sender or destination of messages. |
Next step, we need to specify our message Add, that will force contract do actions according to 4th feature.
Here we specified, that our message should content Integer number of 32-bit length.
Now we begin declare our contract, we will call it SampleTactContract. Also, we need specify our contract's own properties, that will be stored in its storage: owner and counter.
As said before Address defined in the Tact Type system that describes smart-contract's language. General information about Address in TON placed here.
owner- is Address of owner set in forSampleTactContract, and we will use it for double check if message sent by owner or not.counter- integer number stored in contract that keep current value of iteration results.
Before we can use contract in Blockchain we should define its initial process. In our case, it means, that we should declare contract's function, that will define our owner and counter in particular.
This tool in smart contracts called init() function, and we need describe its behaviour next:
Where self - special Tact keyword of current level struct, here we using it for contract's fields we declared. Function init() will:
- Accept one argument of type
Address, set this in contract's fieldowner. - Initialize
countervalue equal to 0.
We defined basic structure of our contract. Next step is adding receivers and get functions:
Tact's facts #4
Let's take a little break and learn more about existing tools in Tact for defining contract's behavior.
We have additional Contract's tools that helps us to describe contract's behaviour. init() - is one of them, and below listed all of them:
| Entity | Description |
|---|---|
fun | Special Tact keyword for declaring function. In general similar to functions in program languages. Functions serves for convenient abstraction of logic and optimization that helps code be more readable. |
init() | Function that declares initial values will be stored in contract's data. It will be use in Deployment process, when contract creates in Blockchain. |
context() | Function that gets common properties about current incoming messages such as sender's Address, message's body and message value. |
recieve() | Special function of contract serves to declare behaviours of contract with messages. |
get fun | Special keywords of contract serves to declare get functions. According to name, this uses to get information from its data. |
Tactical Practice #4 - add contract's behaviour
Ok, one more time, we need extend our contract's behaviour
//previous code

fun add(v: Int) {

    let ctx: Context = context();
    require(ctx.sender == self.owner, "Invalid sender");

    self.counter = (self.counter + v);
}
Declare function add that will do following things:
- Get incoming integer argument
v. - Check current incoming message
senderis equal toownerwe set for contract in deployment process. - If this check passed add to current
countervaluevand updatecountervalue in contract. If required is not pass, throw exception message "Invalid sender".
//previous code

receive(msg: Add) {
    self.add(msg.amount);
  }
}

receive("increment") {
    self.add(1);
  }
}
Here we are specified two receive functions. This means, that if we get message in contract that correspond of one the receiver contract execute one of them. In other case, contract will do nothing.
receive() function expects an incoming argument of String type, Message struct or custom Tact Struct.
Take a look our receivers:
receive(msg: Add)- specifies actions with messages defined in the beginning by Message add. It will content only one integer number of 32-bits length, that we called amount and nothing else. This receiver invokes functionadd(amount).receive("increment")- specifies actions with messages, that contents comment string "increment" in its body. Here we invoke functionadd(v)withv = 1, so we increment contract's counter by one.
contract SampleTactContract with Deployable {
    //previous code

    get fun counter(): Int {
      return self.counter;
    }
Last function we need to specifier is get function counter, that will return value of current counter value from contract. Now our contract is ready, we need compile this, so run:
yarn buildCommand yarn build will compile contract.tact and place result in tact-template/src/output.

Tact's facts #5
Now we on finale stage. We need to deploy our contract to Blockchain. To do this, we will use Ton wallet application. In this way we avoid a lot of details about deployment process, but you can find more about this in low-levels guides.
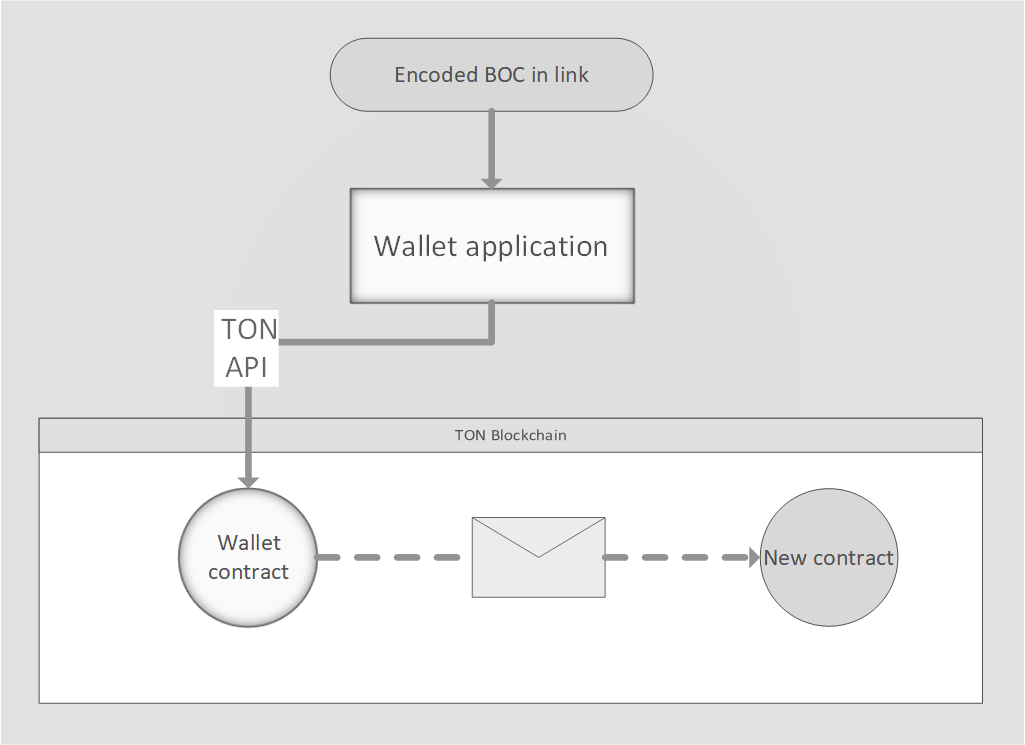
- To deploy our new contract we need send message with init information in its to address of our contract.
- We can know destination address of contract because of definition of Address depends on only from contract's data and code. We know both.
- To send message in blockchain it is necessary to communicate with TON blockchain nodes. Wallet application will do this with own API, so we will avoid this details in current lesson.
- To send outgoing message in TON, sender should pay fees. In our case, we need some funds on Ton wallet to pay this action.
Tactical Practice #5 - deploy the contract
Before deployment, according to said before we need to prepare Ton wallet contract with funds. We will use test environment, that maintained with test nodes and called testnet(production calls mainnet).
- To do this we need install one of ton wallet for testnet:
- Sandbox - separate application for testnet - Android (opens in a new tab)/iOS (opens in a new tab)/MacOS (opens in a new tab)
- Tonkeeper(to switch on testnet, open dev menu tap several times in settings on diamond icon) - Android (opens in a new tab)/iOS (opens in a new tab)/MacOS (opens in a new tab)
-
Create wallet in application according native wallet apps instructions.
-
Get test Toncoins for your wallet from Telegram testgiver bot (opens in a new tab).
-
Get address from your wallet and input it in deployment script -
contract.deploy.ts. For me, it waskQDND6yHEzKB82ZGRn58aY9Tt_69Ie_uz73e2VuuJ3fVVcxf:
- Run
contract.deploy.tsscript to get deployment link in terminal with following command in terminal:
yarn deployIt will ask from you wallet you want use, choose what you used before(Tonkeeper/Sandbox).
- Read deployment link through reading QR or open link via your testnet TON wallet, confirm outgoing message in wallet application.
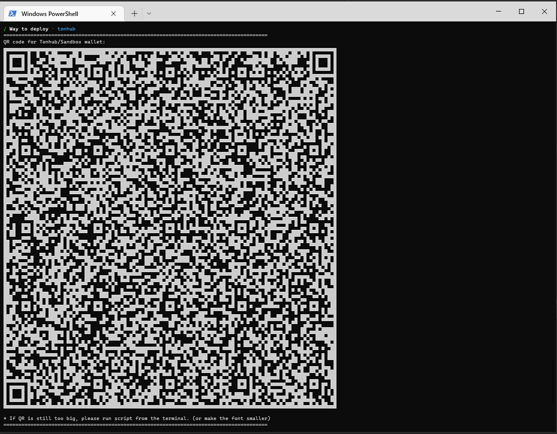
If you faced some compile issue and can't figure out what is wrong, just compare with target contract placed in
sources/example/increment.tactor here (opens in a new tab).
Last Tact and next steps
We sent deployment message and deploy our Contract. We can check result with blockchain testnet explorer (opens in a new tab).
Take your deployed contract address from terminal window or follow ready-made link and check result of sent message in explorer.
In the case of tutorial, deployed contract address was kQAd00TX4YPxBfyWjArkionTZJVMoRzFQUM2ntQBcFycWYr4.
If you saw in blockchain explorer same for your contract...

Yes! You successfully created and deployed your own smart contract, congrats!
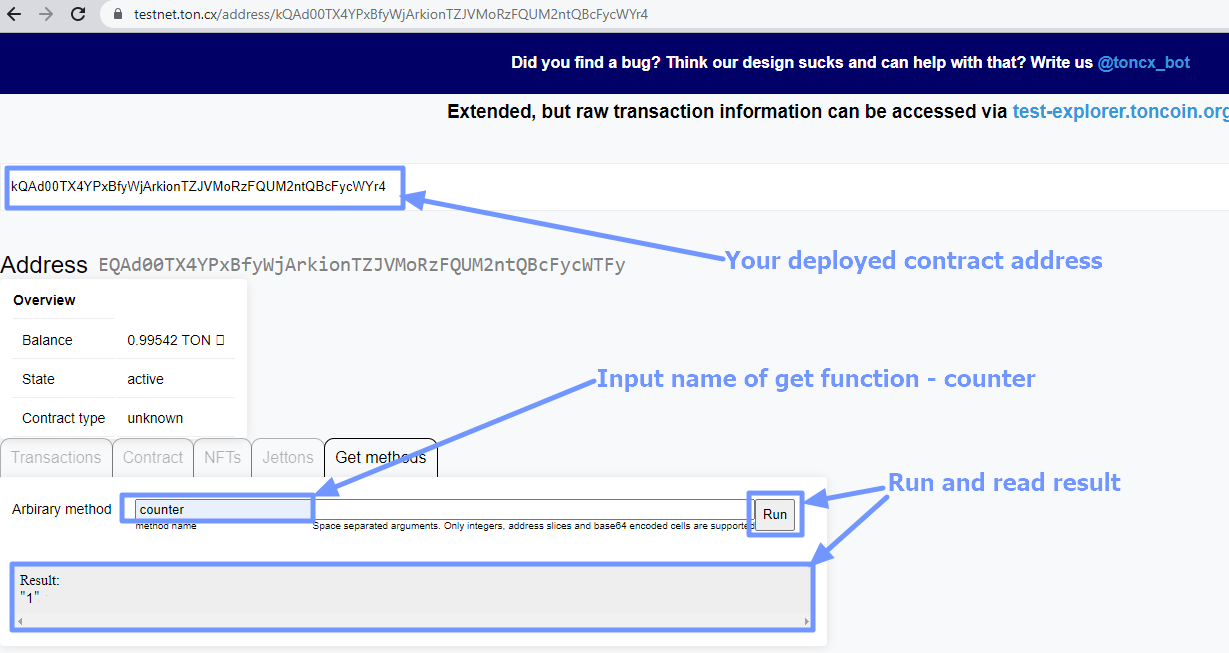
Let's try to find out how it works now? Another blockchain explorer allows to use get function. Let's check current Total value in our contract:
- Find your deployed contract again in another blockchain explorer testnet - ton.cx (opens in a new tab). In the tutorial it is:
kQAd00TX4YPxBfyWjArkionTZJVMoRzFQUM2ntQBcFycWYr4. - Open Get methods tab.
- Input get method name -
counterin Arbitrary method field. Run this and check result (it shows in hexadecimal format).
Now, lets try to send Add(1) message, according to our plan we should send common message with "increment" comment to our contract.
All you need open Wallet app(Sandbox/Tonkeeper) you used before, input your deployed contract address in destination address and type "increment" text in comment(message) field and send it.
Check your counter value after this, make sure that counter value changed.
What is next?
You are great! Take a break young developer, because it was really not simple for you! If you ready to continue to learn, here some examples of where you can go next.
What to read next?
- Wallet.tact contract deployment through public API
- Jetton.tact contract overview and deployment
- FunC journey (opens in a new tab)